 |
| Hot damn! That's impressive! |
As the fateful day loomed we talked briefly about what we would need and what models to build. I supplied an enormous shopping list (drills, pins, putty, glue, cookies etc) which Jack went out and bought. As there were several models available including a Revenant Titan, Scorpion grav-tank and a Vampire Raider we weren't exactly sure which to attempt or even how much we could get done in a day.
As a beautiful Friday morning dawned (nothing like building titans in the sunshine) I headed on over to Jack's and we got stuck in to some resiny goodness. After looking at the models we both knew we had to attempt the Phantom, after all, the point of the day was twofold. Firstly to build some badass miniatures but secondly, to give Jack the confidence to tackle some more of these projects alone.
 |
| Early progress showing the left leg. |
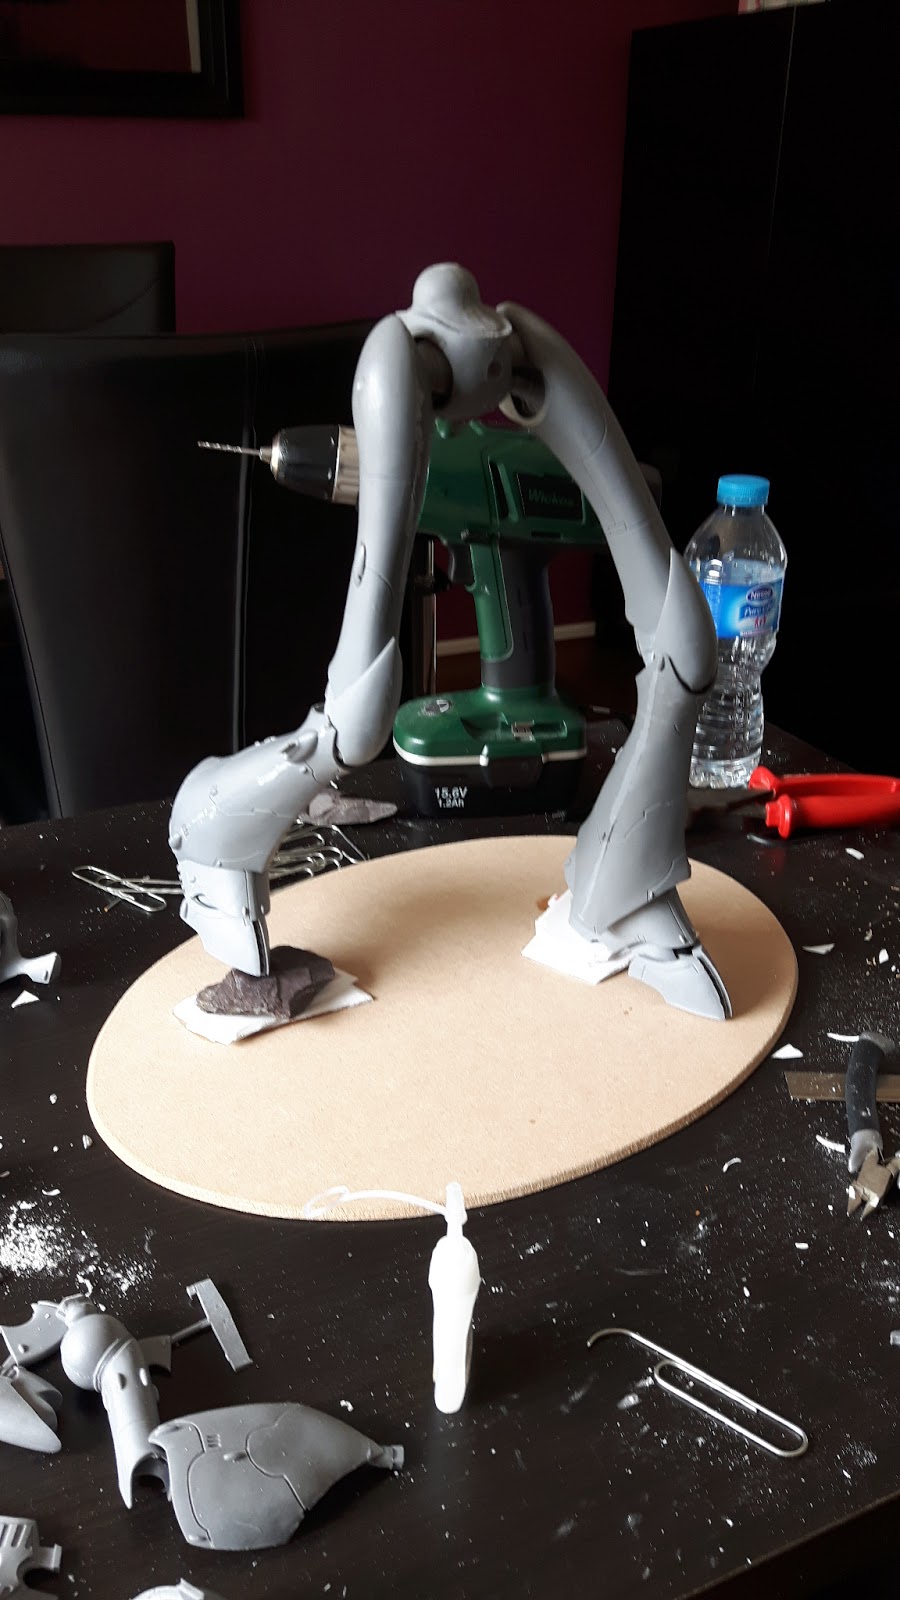 |
| Completed leg assembly, we weren't brave enough to go for a one legged pose! |
As you can see from the photos we were making a horrendous mess (anyone who's ever drilled and sawn resin will vouch for the amount of debris created). The hoover was used liberally throughout the day to try and keep on top of the stuff.
When it came to the torso assembly we hit a snag, one of the components (front breastplate) was missing. Ultimately I left it down to Jack to decide what he wanted to do, should we stop building and try to build the Revenant instead? Luckily he had a brainwave, a battered Wraithknight was laying around in his bitz box and its chestplate was just what we needed, you can see it in the photos below (the horrible purple part).
 |
| Starting to look impressive! |
Then came time to add the head, arms and weapons. Jack declined to paint the inside of the cockpit so the head went straight on. The arms turned out to be a major headache as the guns were really heavy. Much pinning gluing and swearing later and the beast was finished!
 |
| Getting there! |
 |
| Taste the beast! |
What a mammoth of a task. You did a fine job of it. Now hopefully we will see more giants of war emerging from Jack's garage.
ReplyDeleteNone of the others will be anywhere near as big as the Phantom. I don't envy him having that Vampire though!
DeleteA phantom...this would be a good challeng for Monster March 2017 an finishing it at 2018, 2019 or maybe 2020.
ReplyDeleteYou're right! I enjoyed the build but I'm glad I don't have to paint it!
DeleteIt depends on the scheme you want to use. One month will be ok. I painted the revenant in that time, so a month and a half?
Deletehttp://mastodontica.blogspot.com.es/2016/08/proyecto-eldar-x-titan-revenant.html
Having built a Phantom and knowing how many components they have, I'm genuinely impressed that you managed it in a day! Just washing and trimming the parts could take a whole day! You even managed a nice action pose - I've seen too many phantoms end up in the old epic wooden pose because it's such a daunting kit. I think you're secretly an octopus! :)
ReplyDeleteWell, I won't lie, it was quite a challenge and very tiring to boot! Such a great project though, I really enjoy building these huge models. I think we both knew we had to try and make the pose dynamic when we started, it's good to see somebody noticed!
DeleteI got a phantom titan as well, not sure how to keep it all together? cut up paper clips seems to thin to me but no clue what I could use instead! any suggestions?
ReplyDeleteGood question! Is this your first large resin kit? Or do you have experience with other models at this scale? We mostly used large paperclips (get some that are approx 70mm long) but for the major joints 2mm steel wire was used. The two pieces of advice I would give are:
Delete1 Take your time, don't expect to finish this beast in a day.
2 Put multiple pins in the major joints at different angles, particularly the hip/torso joint.
Hope that helps.
my next biggest is an cerastus knight atrapos, so quite a bit bigger!
Deletethat does help thank you very much. if it falls apart I will be back!
one point I might ask, did you use games workshop citadel superglue or is there a better option you would recommend?
I hate to admit it, but I'm actually a fan of cheap superglue. Sometimes the cheaper the better! For years I used Sainsbury's own brand but I've also used Loctite, Citadel, Zap-a-gap (don't touch this stuff, it's terrible) and even Tommy Walsh DIY time superglue!
DeleteIn my experience, most brands will work fine with metal and even better with resin. The citadel superglue should work well with your Phantom.
When you get it built, send me a picture or two and I'll put it on the blog if you like.
thank you so much for the help, ill try find time over the weekend to get it together!
DeleteLook forward to seeing the finished article mate!
DeleteI've got an Eldar Revenant. How would you recommend I pin/magnetise for easy storage? I was thinking of magnetising the arm guns but since they are heavy, the possibility of it dropping off is really there
ReplyDeleteLooking at the model, the easier points to position magnets look to be the elbow joints and the waist. If you're going to go for it I recommend using decent sized magnets in conjunction with pins, that way you can avoid the issue of parts rotating.
DeleteMake sure you recess the magnets within the model and don't try to surface mount them. In my experience this always ends badly!
Hope that helps, send me some photos and let me know how you get on!